

Understanding Virtual Elements in RAP (RESTful Application Programming)
In modern application development, flexibility is key. One powerful feature that enables seamless data expansion without altering underlying structures is Virtual Elements in RAP. This approach allows developers to add new fields dynamically without modifying the existing CDS entity structure.
What are Virtual Elements?
A virtual element is essentially an additional field introduced into an application without making changes to the core CDS structure. The values for this element are generated through business logic implemented within a class and interface, ensuring dynamic and efficient customization.
Key Benefits of Virtual Elements
Virtual elements bring multiple advantages to application development:
- Non-Intrusive Additions: They allow new fields to be incorporated without affecting existing CDS structures, preserving data models.
- Dynamic Value Assignment: Business logic in classes and interfaces drives the values of virtual elements.
- Annotation-Based Definition: With annotations, defining fields becomes effortless and enhances readability.
- Complexity Abstraction: Developers can focus on high-level logic rather than extensive structural modifications.
- Modularity: Virtual elements enable field additions without altering entities, simplifying updates.
- Seamless Integration: These elements connect smoothly with existing APIs, ensuring interface consistency.
- Performance Optimization: Implementation is efficient, avoiding schema changes while supporting rapid evolution.
- Business Logic Customization: Responses can be tailored based on user interactions through encapsulated logic.
Implementing Virtual Elements in RAP
Here’s a step-by-step guide to adding a virtual element to your application:
Step 1: Define the Virtual Element with Annotations
You can introduce a virtual element by specifying the required annotation in your project view. This annotation defines the field and links it to a class responsible for assigning values based on business logic.

Step 2: Position the Additional Field
Determine where the new field should appear in the user interface. Ensure that its position is correctly defined in the metadata of the projection view where the annotation is added.

Step 3: Implement the Class and Interface
The class referenced in the annotation should implement an interface responsible for populating the virtual element’s value.

Step 4: Apply Business Logic for Value Population
The additional field’s values are based on business logic. Implement prior checks to handle cases where records are missing, as this method may be triggered multiple times.

Step 5: Debugging for Validation
Use debugging tools to validate prior checks and confirm how the additional field values are populated based on business logic.

Step 6: Ensure Proper Data Population
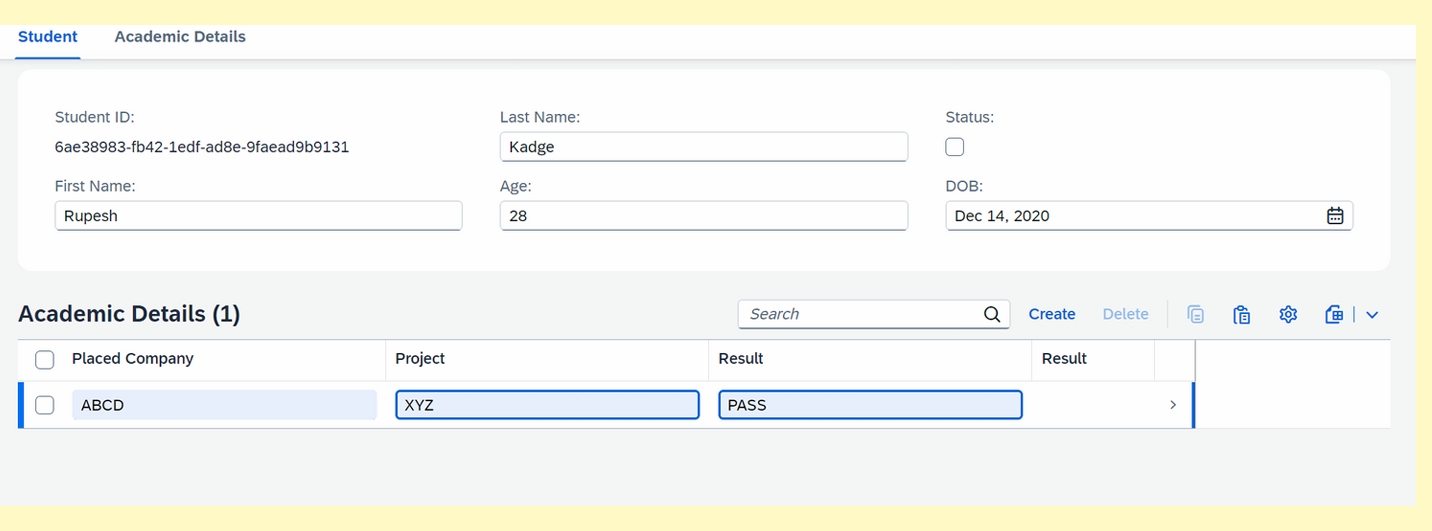
Once all necessary fields are in place, the value for the virtual element (e.g., remark field) will populate dynamically using custom logic implemented within the class.
Step 7: Verify the Final Output
With everything in place, the newly added field will be populated according to the provided logic, appearing seamlessly within the application.

Conclusion
Virtual elements in RAP provide an efficient way to introduce dynamic fields without disrupting existing CDS structures. By leveraging annotations, business logic encapsulation, and debugging tools, developers can ensure flexibility and seamless integration while maintaining high performance.

![ABAP New Syntax Explained: 20 Game-Changing Features Every Developer Must Know [2025 Guide]](https://blogger.googleusercontent.com/img/b/R29vZ2xl/AVvXsEhXnFcBTH0agv8KIVAfRIaEnsMGGbKCIQ81UKWAm2u5l_qOQJg_LphMPk4uN3X4Nf1fj86MuElU6SD0OZVkdPlXhQF5FtYEv0LTdRgTSYHxwvVyY6wYpnbbc8bMmxt1mkrPcUb9P89eeARCnCoFSEn6rXTJ-GM9nQt_RoypoforLedduTwrDlsrSTqdOxc/w100/ChatGPT%20Image%20Jul%2013,%202025,%2010_18_02%20PM.png)

)